Any ham that has more than one radio know that keeping keys and microphones and foot switches can get complicated. I ran into this issue for the Jan 2018 VHF contest. I entered in the HP class, running 6/2/432/1296 MHz. What I totally didn’t plan on was the myriad of microphones and foot switches that I now had to pay attention to.
Long story short, I made a ton of mistakes during the event, grabbing the wrong mic, or sending CW on the wrong band. This had to change before the next contest. Nothing like four of the same Yaesu hand mics all in a rats nest, and trying to find the right one for those late night or early am SSB qsos.
Last summer I picked up a (now unsupported) SO2R (single operator two radio) contest box called the DX Doubler from Top 10 Devices, Inc. I snagged it cheap. It is an awesome box with fully adjustable headphones ports as well as mic and CW inputs.
However, it only works with two radios.
BUT.. what if you have 3 or 4 or soon to be my case.. SIX different radios that you need to pay attention to? At this point, you are starting to get into microphone hell with all the different cables. I needed a more ‘elegant’ solution and something that will work with my operating style.
Requirements:
- Voice transmission to all radios via my Heil Proset Plus headset
- Send CW via one of three keys
- Control PTT to each radio via 1 foot switch (not 3 or 4 or 6)
- Ease of access
- Contest proof
- Easy to teach a guest operator
- Expandable to 6 different radios
I looked around the web and found two different “mic” switching box ideas.
- The CW key switching box by Mike, AB3AP
- The Amateur Radio Station Microphone Switch Box by Doug, WA3DSP
Both of these projects are great on their own, so I used both ideas to design my box. Thanks Mike and Doug for the great pages on your projects!
Enter the N1RWY Station Master V1.0
I am not a patient man when it comes to my projects. I want things to work now. I fully value function over looks. I free hand everything. (drill, saw, cut, etc) Having said that, I have the up most respect for those that build and construct items with precision.
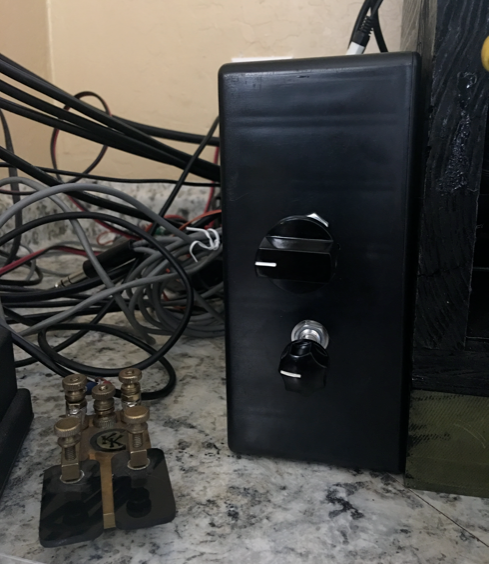
My Station Master V1.0 was designed around the use of 6 different radios for contesting, with one mic and the option for 1 of three sets of keys or a straight key.
My first mission was to find a 6 pole (for 6 different radios) 6 position switch. There are plenty of 5 pole switches out there, but not a ton of 6 pole 6 position. I ended up ordering one off Ebay for $16.
My first thought was to have the CW and the Mic controlled via the same rotary switch. Sure, a 6 pole, 6 position switch would handle everything I wanted, Mic, mic ground, CW (dahs and dits) and PTT.
However, as many VHF contesters know, often you are meeting on one frequency via voice to coordinate on another band for CW. In my original design I would be tying voice and CW to the same band, and restrict my ability to work voice on one while CW on the other. My receive system can RX several radios at once, so hearing isn’t the issue, sending is.
So, I decided on a separate switch for the CW keys, a 2 pole (dits and dahs on the keyer) 6 position switch from Fry’s Electronics for a few bucks, so I could be sending CW (or set to send CW) on radio #4, while transmitting voice on radio #3. Cool.

Station Master V1.0
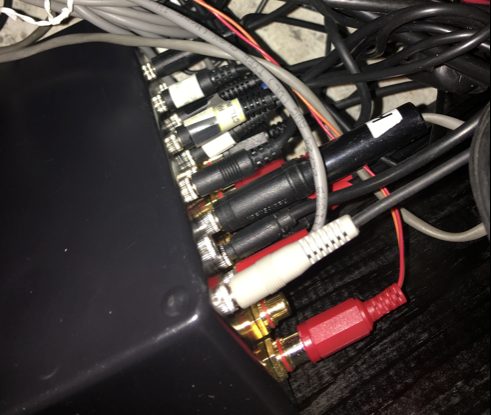
The back of the box is all of the connections back to the radio, I standardized the CW jacks to the smaller 3.5mm and made custom cables for the radios that needed the 1/4″ jack connectors. The other radios just used a standard 3.5mm extension cable. (I totally miss my local Radio Shack for all of these parts).

Inputs for the Mic and radios, the toot switch and PTT lines and the CW keys.
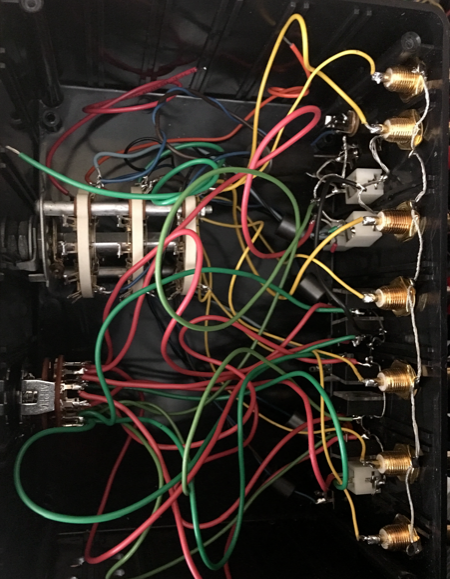
The inside of the control box is a rats nest of wires. I know, it is ugly. U-G-L-Y… Yep, I own it. My gear isn’t especially pretty, but it is functional. I did follow Doug’s advice and put ferrite beads on the mic leads. I did take the time to at least wire up the remaining unused poles so if and when I decide to use them, I don’t have to pull the entire switch out to solder the wires on – and I left the upward facing positions open for easy access.. I DID think this through!
Yes, I should have used different colored wires for each different pole on the different switches. If visual disorder bothers you or your have OCD, look away now. I tried my best with what I had and was not going to let a lack of wire color to stall the project. Feel free to send me some purple or pink wire and I will use it to make it neater.

The rats nest of wires from all the different positions to the 3.5mm and RCA jacks on the back.
As a version 1.0, I still have some work to be done.
- I need to label the rear so if cables become disconnected I know where they go without effort.
- I need a guide/labels for the front. They are wired in order from left to right with the radios on the desk, but a visual, either labels or LEDs would help. I could wire the (-) off one of the unused poles on the 6P6T switch to illuminate when I am on that specific pole/ radio for the mic, so when I switch the mic rotary switch the previous LED would turn off and the next would turn on. I could get fancy with different color LEDs as well for each radio, it is all a matter if I want to add the LEDs and add 12V to the back of the box.
- Possibly I might need more ferrite beads on the mic leads time will tell on that.
It was a fun project and I a super excited with the results and the possibilities it will bring me when I get all the gear situated for the next contest.
If you have more than one rig, I totally recommend making some sort of interface box, even if you are switching between two different mics to one radio, a switch box just makes it a lot easier to deal with.
73 and hope to work you on the air!
Phil K7TTI February 6, 2018
I think you did a great job with this. I’d leave the rat’s nest alone and do the cable-to-box labels for sure.
n1rwy February 6, 2018 — Post Author
Thanks Phil for the comment!
It was tedious work at times, but the reward was worth it. Labels should happen soon. I am very happy with it so far.